Most folks overlook what really happens inside a toaster over time. Crumbs are only part of the story – hidden damage grows quietly beneath. Heat cycles strain components slowly, tiny cracks form in metal parts without notice, while dust and gunk increase resistance where electricity flows. Many assume these boxes last until they fail. A quick flip and tap empties loose bits, yet leaves hazards behind. Burnt leftovers warp how warmth spreads across slots, patchy upkeep wears coils unevenly, even wiping too close with a wet rag invites sneaky problems later on.
Unplug the Toaster First
Unplug first. It feels basic yet counts way more than most think. Even a short connection while wiping down might leave charge hiding inside components – especially units built since 2015, which sometimes delay their power shutoffs. Give it ten full minutes without plug contact before moving forward. Wait until the device has been unplugged long enough to reach room temperature. Ignoring this raises chances of issues, not from electrical jolt – that’s rare – rather from tiny shifts in part sizes when warm, altering their reaction to touch.
Safety Checklist
- Unplug the toaster
- Wait at least 10 minutes
- Allow it to cool completely
- Work on a dry surface
- Never clean while connected to power
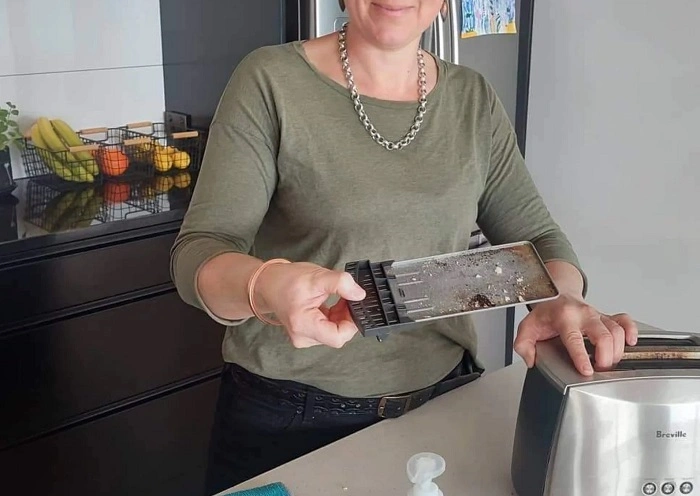
Remove and Clean the Crumb Tray
Start by taking out the crumb tray. Some toasters lack this part, especially simpler or vintage ones. If yours has one, pull it free without rushing. Cleaning is allowed just when marked safe for dishwashers. Aluminum makes up many trays, some get a coating on steel. Over weeks, dishwasher cleaning mixes – especially those intense pods – can wear down shields meant to protect. Try washing by hand, using water that feels warm but not hot along with just a bit of gentle soap. Right after, grab a cloth that won’t leave fuzz and wipe it dry. If dampness stays hidden beneath where the tray fits, it might sneak into spots never made for wet conditions.
Crumb Tray Cleaning Tips
| Do | Avoid |
| Hand wash with mild soap | Harsh dishwasher pods |
| Dry completely | Reinstalling while damp |
| Use warm water | Extremely hot water |
| Wipe with lint-free cloth | Leaving moisture behind |
Clean Inside the Slots Carefully
Inside those slots? Think twice before sliding in any sharp utensils. Knives, forks, or tongs can gouge the smooth enamel layer. That protective coating guards the heat coils beneath. Damaged spots leave nichrome wires open to air. Oxidation kicks off more quickly once that happens. Hot spots show up when some parts of the coil oxidize more than others, making those sections burn hotter. These uneven zones build stress over time, slowly bending the metal out of shape across many uses. Try tipping the toaster so it leans on its side – never flipping it completely – and give it a soft shake by hand. Bits that are already unattached drop free because they follow gravity down instead of getting scraped loose.
What Not to Put Inside a Toaster
- Knives
- Forks
- Metal tongs
- Sharp scrapers
- Wet cloths
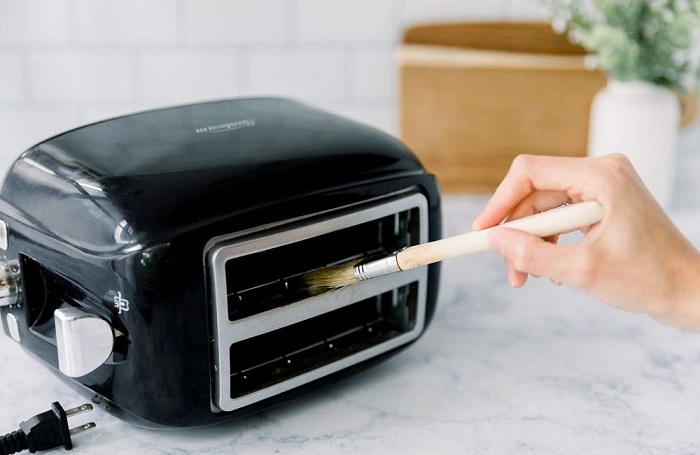
Use a Soft Brush for Stubborn Crumbs
A gentle touch matters when picking a brush – choose soft bristles, preferably one kept just for appliances. An old toothbrush might do, provided it has never touched teeth and uses nylon tips. Firmness shifts noticeably from brand to brand. Press the tip on your nail; if it leaves a mark on flesh, discard it. Start high, move low, guiding strokes along the bottom edge of every opening. Most gunk under the surface stays harmless. Pushing too hard with brushes might free bits that slip down past the base cover. Those hidden layers near the bottom hardly ever slow things down. A light touch keeps loose pieces from reaching delicate parts underneath.
Wipe the Outside Properly
Last, clean the outside parts. Smudges show easily on stainless steel, yet many polishes made for kitchen gear have chlorides. Under a microscope, tiny pits appear when those are used – this kind of damage weakens the surface slowly, especially after five years or more. Try this instead: combine distilled water together with just half a percent white vinegar. Start wiping with a quarter-folded microfiber cloth. Each swipe uses one clean section only. When grime shows, refold to a fresh part. Liquid must never touch the outer shell by spraying. Moisture can slip through gaps near buttons and dials. Inside circuits sit just behind those openings.
Exterior Cleaning Supplies
- Microfiber cloth
- Distilled water
- White vinegar
- Soft brush
- Dry lint-free towel
Avoid Steam Cleaners and Compressed Air
Steam cleaners are best left unused around electronics. At 248°F (120°C), household models run near the heat limits of wire insulation. Over time, that heat degrades plastic coatings on wires. Another risk comes from canned air when sprayed upside down. Inside those cans, difluoroethane may turn liquid upon release. That fluid can briefly conduct electricity in circuits meant to stay dry.
Also Read: How to Cancel AutoPay in Google Pay
Pay Attention to the Toaster’s Location
Hidden buildup often ties to where appliances sit. Close to a stove, toasters catch oily air drifting by. Next to a kettle, they soak up steam filled with minerals. These situations leave behind substances that carry current. Once a week, clean the counters close by to cut down on particles spreading. Little bits floating in the air slowly land, changing how the controls respond when touched.
Most of the time, where you live matters more than how often you clean. When gas stoves are used indoors, tiny amounts of nitrogen compounds turn up in dust near kitchen gadgets. Those particles don’t play well with old rubber coatings on certain cords. Once every few weeks can help if that’s your setup. If not, checking things out three times a year works fine.
Do Not Take the Toaster Apart
Most household toasters can’t be taken apart completely. Service guides always caution users about removing outer casings or bottom plates. Break that rule, certification fails. Specialized gear – set to exact pressure levels – is needed inside; regular people won’t find it anywhere nearby.
Common Cleaning Myths
Mid-cycle, a few toss in plain bread to pull out gunk – claiming it soaks up leftover crud. Truth is, that idea holds no water mechanically. Hardened carbon does not vanish into sandwich loaf. Occasionally, crumbs snag bits flying free during cleaning bursts. More often, the toast burns deeper, pumping thicker smoke next time flames fire up.
Water anywhere on it is a bad idea. Even after drying, hidden wetness can wreck the tiny metal connections. Once inside, fluid sneaks into spots you cannot see. Over days, trapped damp creates small electrical reactions – often mistaken for regular aging when things stop working early.
Run a Test Cycle After Cleaning
Once cleaned, try a test cycle without bread – medium heat works best. Keep an eye out for odd smells or smoke during the first go-around. A faint scent from warmed particles is nothing to worry about. If sharp fumes linger, parts might still hold leftover gunk. Go back over it with the brush when that happens.
Signs Your Toaster Is Clean
- No excessive smoke
- No strong burning odor
- Even browning on toast
- Smooth lever operation
- No loose crumbs falling out
Extend Your Toaster’s Lifespan
Start too hard, you lose ground faster. Scrubbing strong chips away at surfaces bit by bit. Every round leaves tiny scratches, nudges parts out of place, wears down spots that touch. Gentle lapses last longer than forceful care.
Seven years – that’s how long a cared-for toaster usually makes it. Since the early two thousand s, that number has held steady even though materials got better. Gains stopped climbing once factories prioritized lower costs during large-scale making. Scrubbing it down doesn’t push life much further. What cleaning does do? Keeps performance steady inside normal boundaries.
Most breakdowns start not from grime, yet from pressure on hinges. Lowering the arm repeatedly pushes too hard on plastic pivot points. A steady position cuts sideways strain. When the surface tilts past one degree, slide a leveling pad below it.
FAQs About Cleaning a Toaster
How often should I clean my toaster ?
For most households, cleaning every few weeks is enough. If you use it daily, empty the crumb tray more often.
Can I wash a toaster with water ?
No. Water can enter hidden electrical components and cause damage, even after the toaster appears dry.
Is it safe to use a knife to remove stuck crumbs ?
No. Sharp metal objects can damage protective coatings and heating elements inside the toaster.
Why does my toaster smell after cleaning ?
A slight smell during the first test cycle is normal. Strong or persistent odors may mean crumbs or residue remain inside.
Can I put the crumb tray in the dishwasher ?
Only if the manufacturer labels it dishwasher-safe. Hand washing is often the safer option.
Start by touching things lightly. Go slow because steady beats fast any day. Stop before it feels overdone – almost done is enough.